
One of my crafting goals has been to delve deeper into quilting. I've heard it's dangerous territory, that you'll find yourself stock-piling fabrics and day-dreaming of patterns, but I'm willing to take my chances (wink). Although I've done simple quilted cushions, I've never done any quilted blankets. Mostly because of a deep-seated dread (more like a paralyzing fear) of binding. But my Dad is having trouble staying warm these days, so I faced my fears and got to work.
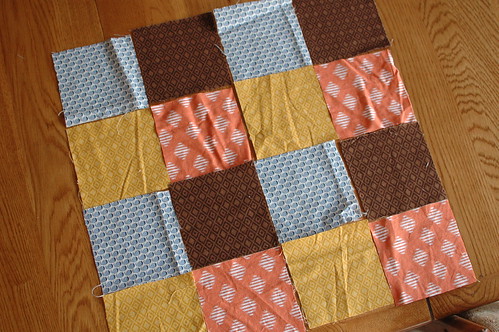
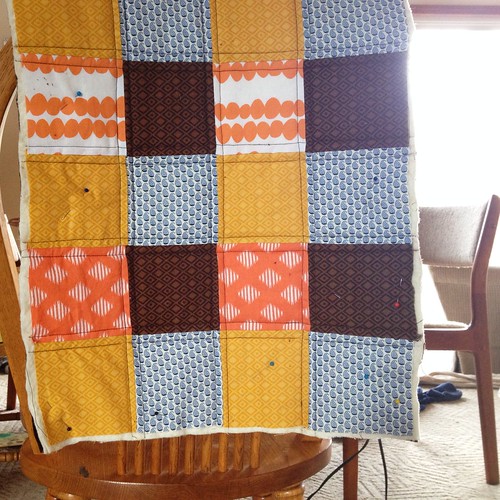
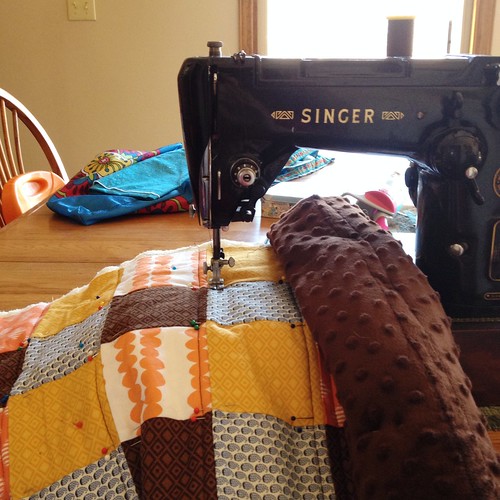
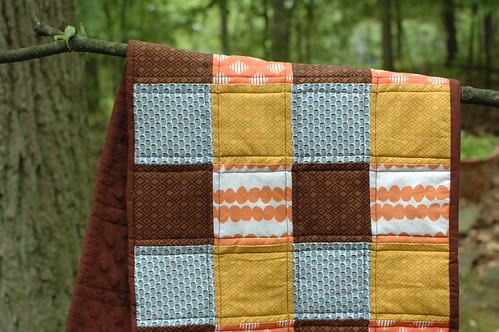
All the fabric was from my stash. Going into this project, I never would've expected to have a lap quilt's worth of fabric. It turns out I had that, and much, much more! It's amazing how quickly it piles up (ahem). The whale print I've had since my teaching days, waiting for the right project. I kept the pattern simple, so it would be a comfort and not a confusion. The binding- aided by sleeping kids & a dram of wine- also went well. It's not perfect, but a good step in the right direction. All in all a nice cozy quilt for his lap or shoulders, especially with its doubled-up batting! We've enjoyed some good snuggles with it first, just to make sure (smile).
Here's the second skirt pattern, as promised! If you missed the first pattern, you can find it here. As I've shared before, we live at least a half an hour from everything. Which can make projects tricky sometimes. For instance, when you're making a onesie dress and forget to buy the plain onesie (ahem). So, after some digging around, I found these bloomers & had an inspiration. Two in one! I love how these layers stay together when Esther is wearing them. Simple for dressing, and diaper changes too.

To make this 3/6 month skirt, you'll need:
- 1/3 yard of fabric
- ribbon in any width greater than 1/4", 32 inches
- 1/8 inch wide elastic
,15 inches*
- 3-6 month bloomers
, ruffles highly encouraged
Step 1: Measure & cut your rectangle. For this 3/6 month skirt, I cut my rectangle 30 inches wide by 9 1/2 inches long**. This skirt hits right at her chubby little knees, which gives her length to grow- very important!
**If you have bloomers for a larger size, you can easily add to the width. Measure the top of your bloomers, then multiply that number by 4. For a longer skirt, just add to the length as desired. I reference this chart when deciding on waist size & skirt length for girls 6 months-15 years.
Step 2: Sew the back seam together, making a long skirt tube. My seam allowance was 1/2 inch, but you can use whichever allowance you like. Press the seam open.
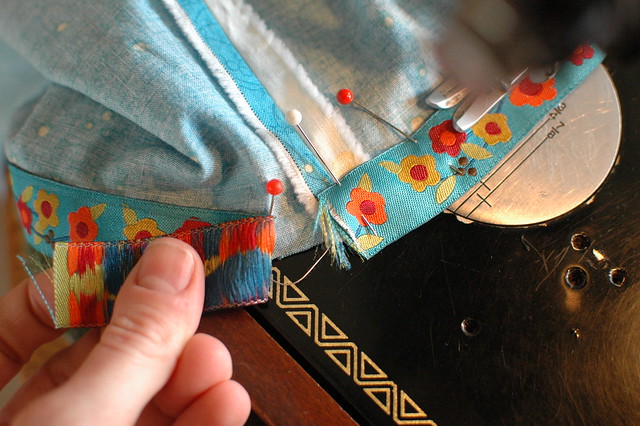
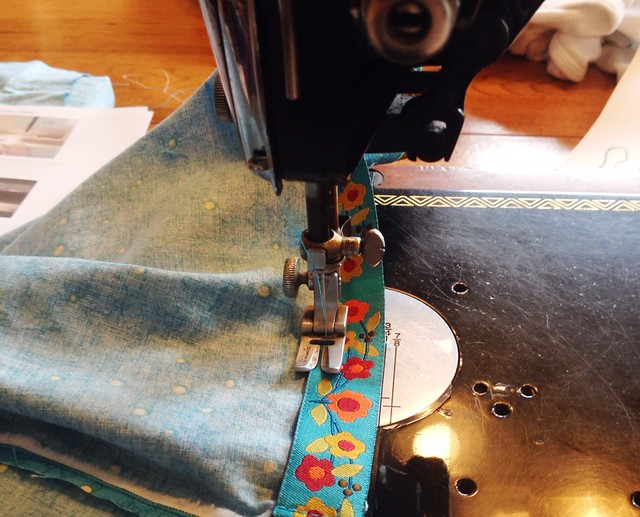
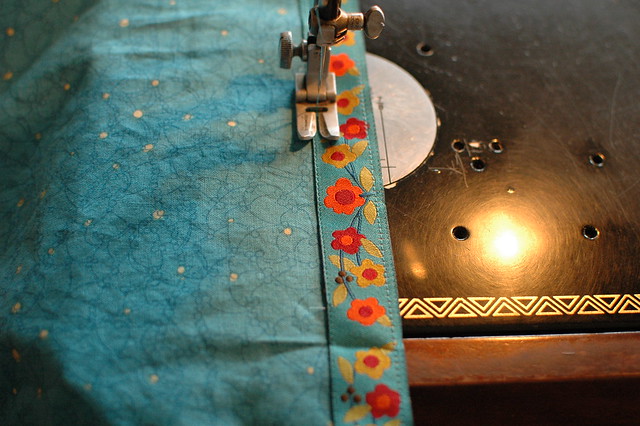
Step 3: Hem your skirt. You can sew a standard hem, or a super easy ribbon hem. I follow the ribbon hem directions on this free Oliver + S skirt pattern.
Step 4: Then attach the elastic to the top of skirt, per step 8 on these instructions via Barefoot in the Kitchen. If you have larger bloomers you'll need a longer elastic too- check out this step to get the proper length measurement.
Step 5: This step is optional, but I found it very handy for attaching the skirt to the bloomers. I sewed the skirt to the bloomers using a very loose stitch. Alternately you could pin them together, but I think this took the same amount of time- without shifting on me (or pricking my fingers) as I sewed.

Step 6: Sew a small zigzag stitch from the outside with a coordinating thread, right over your elastic gather (from Step 4). Make sure you're catching your bloomers as you sew, and that you back-stitch at the end. I went back and forth a couple times at the end for strength; Esther is small but mighty! Remove the thread from Step 5, if you used one.

Step 7: Admire, enjoy, celebrate!

Step 8: Take necessary pictures with big sister, in matching skirts. Can you see those chubby little feet? I'm biased, but I think those might be the most kissable toes ever. But that's just my opinion (wink).


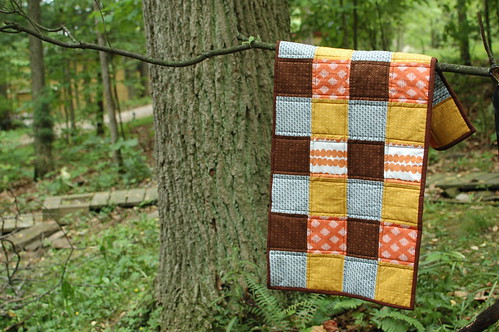
As you can see, it's great for playing in the woods. Which means there's already been a request for "at least one more." It's already been laundered twice, and is holding up great, so I see at least one more in our future. Perfect for adventures!
*Affiliate links, thanks for your support!


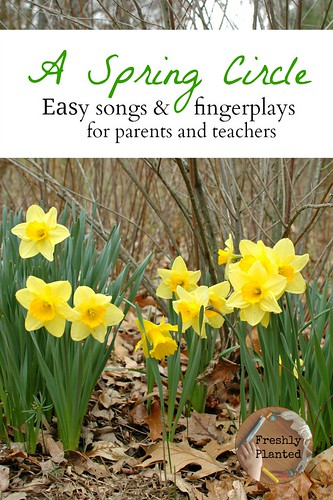
We first encountered "circle time" at the library's story time. It was amazing to watch wiggly little bodies synchronize together for ten minutes as they followed the teacher. When we began homeschooling, it was an easy way for us to begin our school-time every day.
It's been an important part of our school routine every since.
The best part has been memorizing the songs & fingerplays together! The fingerplays are handy while waiting in lines or restaurants, and singing circle songs is a fun way to ease transitions (or get a smile from a grumpy preschooler). These are new songs and fingerplays that we've added to our rotation this spring, we hope you enjoy them too!
 |
Waldorf-Inspired Spring Songs & Fingerplays |
We act this out with our hands, creating a flower during the last
line with two raised hands cupped together palm to palm with fingers
spread. Alternately, you could have the children crouch down, perhaps
covered with a play scarf at the beginning for the "ground", then
encourage them to grow "up" into flowers during the last line.
In our winter garden, seeds lie warm below,
In our winter garden, seeds lie warm below,
flowers are waiting, waiting, waiting,
for the Spring to show.
We
say this one as a poem, with questioning hands during the first line.
The kids then sink down to sleep (or act like they're nibbling nuts) in
the third line, before "waking up" in the fifth line to perform the
action. They do the animal's actions for a minute or so, then we all
join hands (which brings them back to circle) and twirl in a circle for
the last two lines. Squirrels were originally jumping in the last verse,
but Isia thought climbing would be better (smile).
Where are the froggies when the north winds blow?
We cannot see them in the ice and snow.
Deep, deep down in the mud they lie,
froggies sleeping with tight-closed eyes.
When the warm spring sun comes out,
froggies wake and jump about.
Oh how happy they will be,
a springtime world they will see!
Where are the turtles when the north winds blow?
We cannot see them in the ice and snow.
Deep, deep down in the mud they lie,
turtles sleeping with tight-closed eyes.
When the warm spring sun comes out,
turtles wake up and crawl about.
Oh how happy they will be,
a springtime world they will see!
Where are the bears when the north winds blow?
We cannot see them in the ice and snow.
Deep, deep down in a cave they lie,
baby bears sleeping with tight-closed eyes.
When the warm spring sun comes out,
bear cubs wake up and run about.
Oh how happy they will be,
a springtime world they will see!
Where are the squirrels when the north winds blow?
We cannot see them in the ice and snow.
Cracking nuts in a hollow tree,
squirrels are cozy as cozy can be.
When the warm spring sun comes out,
squirrels wake up and climb about.
Oh how happy they will be,
a springtime world they will see!

I've sang different variations of this in Waldorf circles. It's a very old folk song, but I could only find the tune here- not any videos with people singing. If you come across one, please share!
Winter goodbye, Winter goodbye
Winter goodbye, Winter goodbye
You may no longer stay,
springtime is on its way.
Winter goodbye, Winter goodbye.
This
is the kids' favorite! They curl up on the floor at the beginning, like
little seeds. Then I "grow" them! I "sprinkle earth" on them (line
two), pat them (line three), make a wish (line four), give them sun by
making a circle with my hands (line five), rain down on them by lightly
tapping them with my fingers (line five), and then they grow tall into
flowers with "blossoms" (two raised hands cupped together palm to
palm with fingers spread). I usually get asked to "grow" them over and
over again (wink).
A little seed for me to sow,
a little earth to make it grow.
A little hole, a little pat,
a little wish, and that is that.
A little sun, a little shower,
A little while, and then a flower.

Sang to the tune of "Ten Little Indians," I based this song off a
similar bubble one we sang at library time. We count fingers during the
first three verses, then have "raining fingers" until the last line when
we make a circle "puddle" with our hands. This is a great song to
whisper-sing together like a secret while waiting in line at the store.
One little, two little, three little raindrops,
One little, two little, three little raindrops,
Four little, five little, six little raindrops,
Seven little, eight little, nine little raindrops,
Ten little raindrops falling down!
Falling, falling, falling raindrops,
Falling, falling, falling raindrops,
Falling, falling, falling raindrops,
Ten little raindrops make a puddle!
A great fingerplay to lead into "A House Is a House for Me" (see below).
This is a house for robin
(make a nest with hands)
This is a hive for bee
(two fists together to make a hive)
This is a hole for bunny
(thumbs & pointers on both hands to make hole)
And this is a house for me
(arms and hands form roof overhead)
Several verses were found via The Mystical Kingdom, a great place for even more spring songs!
______________________
More everyday songs can be found here, by Sarah Baldwin (Waldorf educator, owner of Bella Luna Toys). Her "blossom" fingerplay during the mealtime blessing is how we make the flowers in the verses above: https://www.youtube.com/watch?v=vXPTN-Iw46I

More Spring Songs & Fingerplays
Books that we're reading this spring:
*Affiliate links, thanks for your support!


I'm not much of a pattern person, as I've admitted before. Before kids, my sewing efforts required a lot of estimation and guessing- which can be timely, with no guarantees. Time is a bit more precious these days, so I'm learning to embrace the joy of the pattern. It's especially handy as a jumping off place. Because if the basics are already engineered out, then you can focus on the details. And the details? Those are my most favorite part of all.
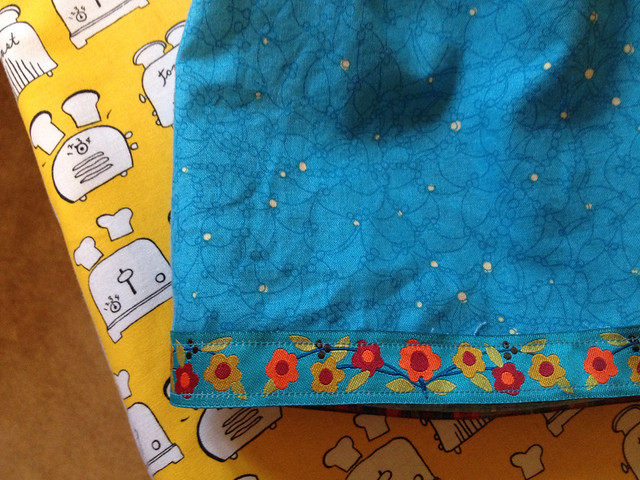
Growing up there were always new Easter dresses. Something pretty, that would stay in the fancy party rotation through summer. And someday, I always hoped, I would sew something special for my daughter or daughters for Easter. Now two daughters later, that time has come! I'm not quite up to a dress yet, but a skirt? A skirt I can handle, especially when it's a free pattern from oliver + s. I've always loved looking at their patterns, but this Lazy Days Skirt pattern was my first to sew. It was a delight to work with! Of course, picking out the fabric was the most fun part of all.

I was so excited to try the ribbon hemming of the pattern, especially when I found this ribbon! Luckily, Isia loved it as much as I did. Although I did have to insist that it only be used in the skirts, not in her art projects. Which was fortunate, because I ended up having just enough to make Esther's skirt too- which I'll share later this week.
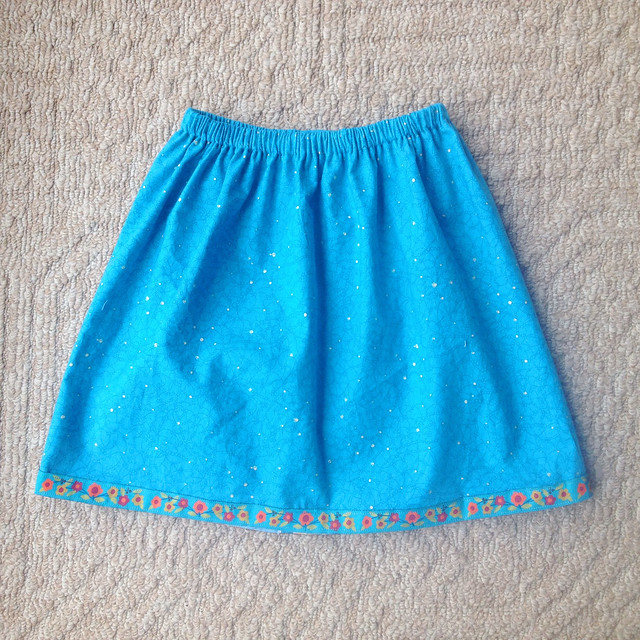
And then it was done. Pretty for church, but practical enough to come home and start playing in the muddy yard directly afterwards (ahem). A perfect pattern for full summer days... which means my sewing machine is going to be busy!
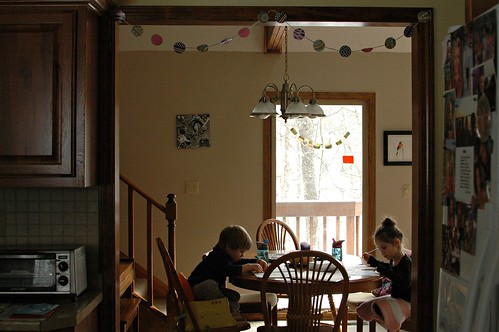
We often get on a creative streak around here. Such as when everyone decided they love markers, and we did one marker project after another. Or my obsession with plastic lids. Our most recent creative streak is garlands, and it began with this sun:
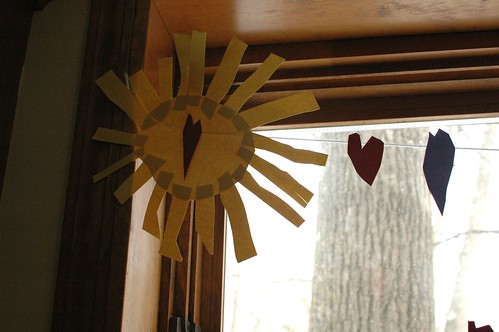
Isn't it great? Isia loves to cut and glue these days, and made it by herself. Well, then it needed some hearts "for company," so she made those. Then there needed to be a house. And then, finally, she wanted to hang it all up to be displayed. At first I thought about just a single string garland, but I knew the house would just keep flipping over since it was so heavy. So I ended up taping up a "z" of string over our kitchen window, and taping everything (on the back) to that.
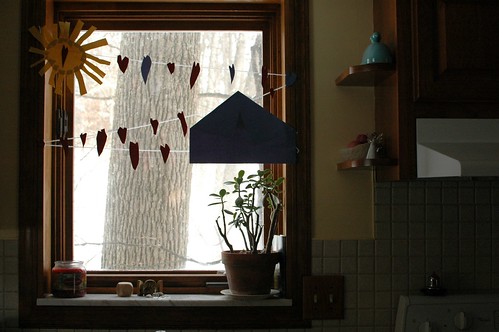
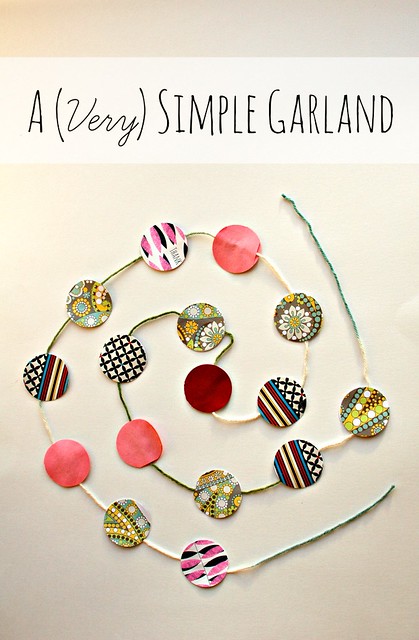
Well, that looked so cheery compared to the snow we had at the time, that we decided we needed more garlands! So we added this one to our collection.
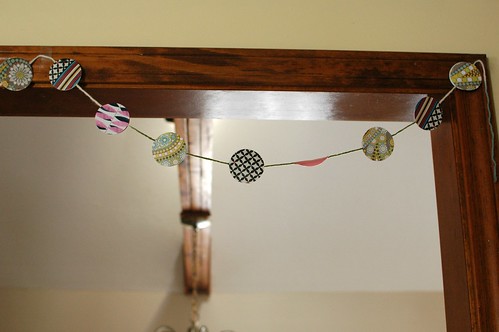
It's so simple! Isia used our round squeeze punch on cardstock, construction paper, and old cards to create a big pile of circles. Then Billy use his big preschooler skills to help find the matching circles & glue them onto a piece of cotton yarn
 for hanging. We'd lay one circle down, add glue to it, then our yarn, then our matching circle on top. I left long yarn ends on both sides for hanging.
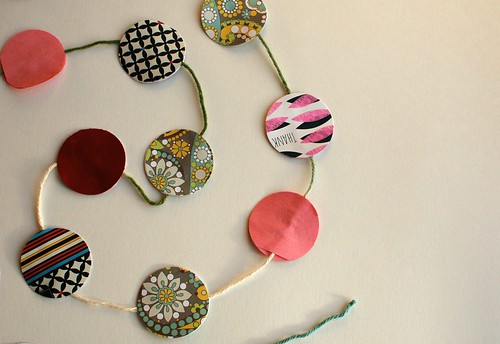
You can place your circles as close together as far apart as you like. A perfect way to welcome company, or a gathering... or a long awaited spring!
*This includes affiliate links for products we use and enjoy. Thanks for your support!
________________________
Thanks for visiting!


